| Members can log in by clicking on icon to the right |

Ply splitting
Julie Hedges has created a beginners guide to ply splitting, to download click here
It includes: Basic Ply-Splitting for 4 ply cords; Ply-split Darning (PSD); Single Course Oblique Twining (SCOT); Plain Oblique Twining (POT) and a Ply-Split Braiding Bibliography and list of Resources.
As an alternative, the original Begin Braiding contained the instructions for a ply split bookmark shown below.
A ply split bookmark by Rachel Hardy
Cut the following lengths of your chosen yarn:
One 3m length of blue, one 3m length of brown,
two 1.5 m lengths of blue, two 1.5m lengths of brown.
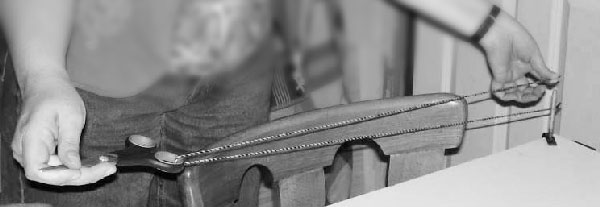
Make four cords, 1 blue, 1 brown, 2 mixed, by doubling them up, fixing one end to a post or doorknob, twisting the two strands together anti-clockwise (you can use a pencil or rod or even an electric screwdriver with a hook) until they start to coil up if tension is released. Attach a heavy item like a pair of scissors to the cord (with a S hook) and double it back on itself. Let the scissors hang down and hold both ends while the cord starts to form. When the cord stops twisting give it a few more turns by hand and then fasten the ends by Sellotaping round them at both ends, remove scissors,
 |
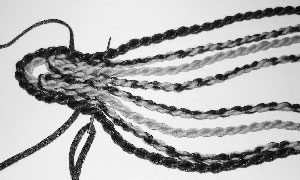 |
I laid out the cords in a dark and light pattern as in the picture, but you can make your own design, of course.. Then take a single strand of either of the yarns, (I chose the colour of the outer cords) and thread a darning needle with it. Pass the needle through the cords, making sure to pass in between the two plies that have been formed, lining the cords up as you go. |
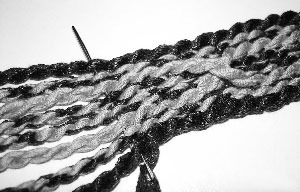
| Go back and forth like this for about 5 cm and then I added some interest by switching the position of two of the cords. Again, any design is possible - here you will be darning through the cords that stay in place for a number of rows until the crossed cords can lie in between again comfortably. Continue as before the twist pattern until a reasonable length bookmark has been created. |
 |
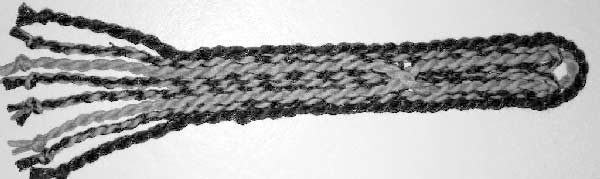 |
| I then knotted each cord at 5 cm from the bottom row of darning and cut off the excess cords. The two ends of the darning yarn, I darned back into a cord of the same colour to finish it off. |
Begin Braiding is based on original material prepared by Felicity Tregear.